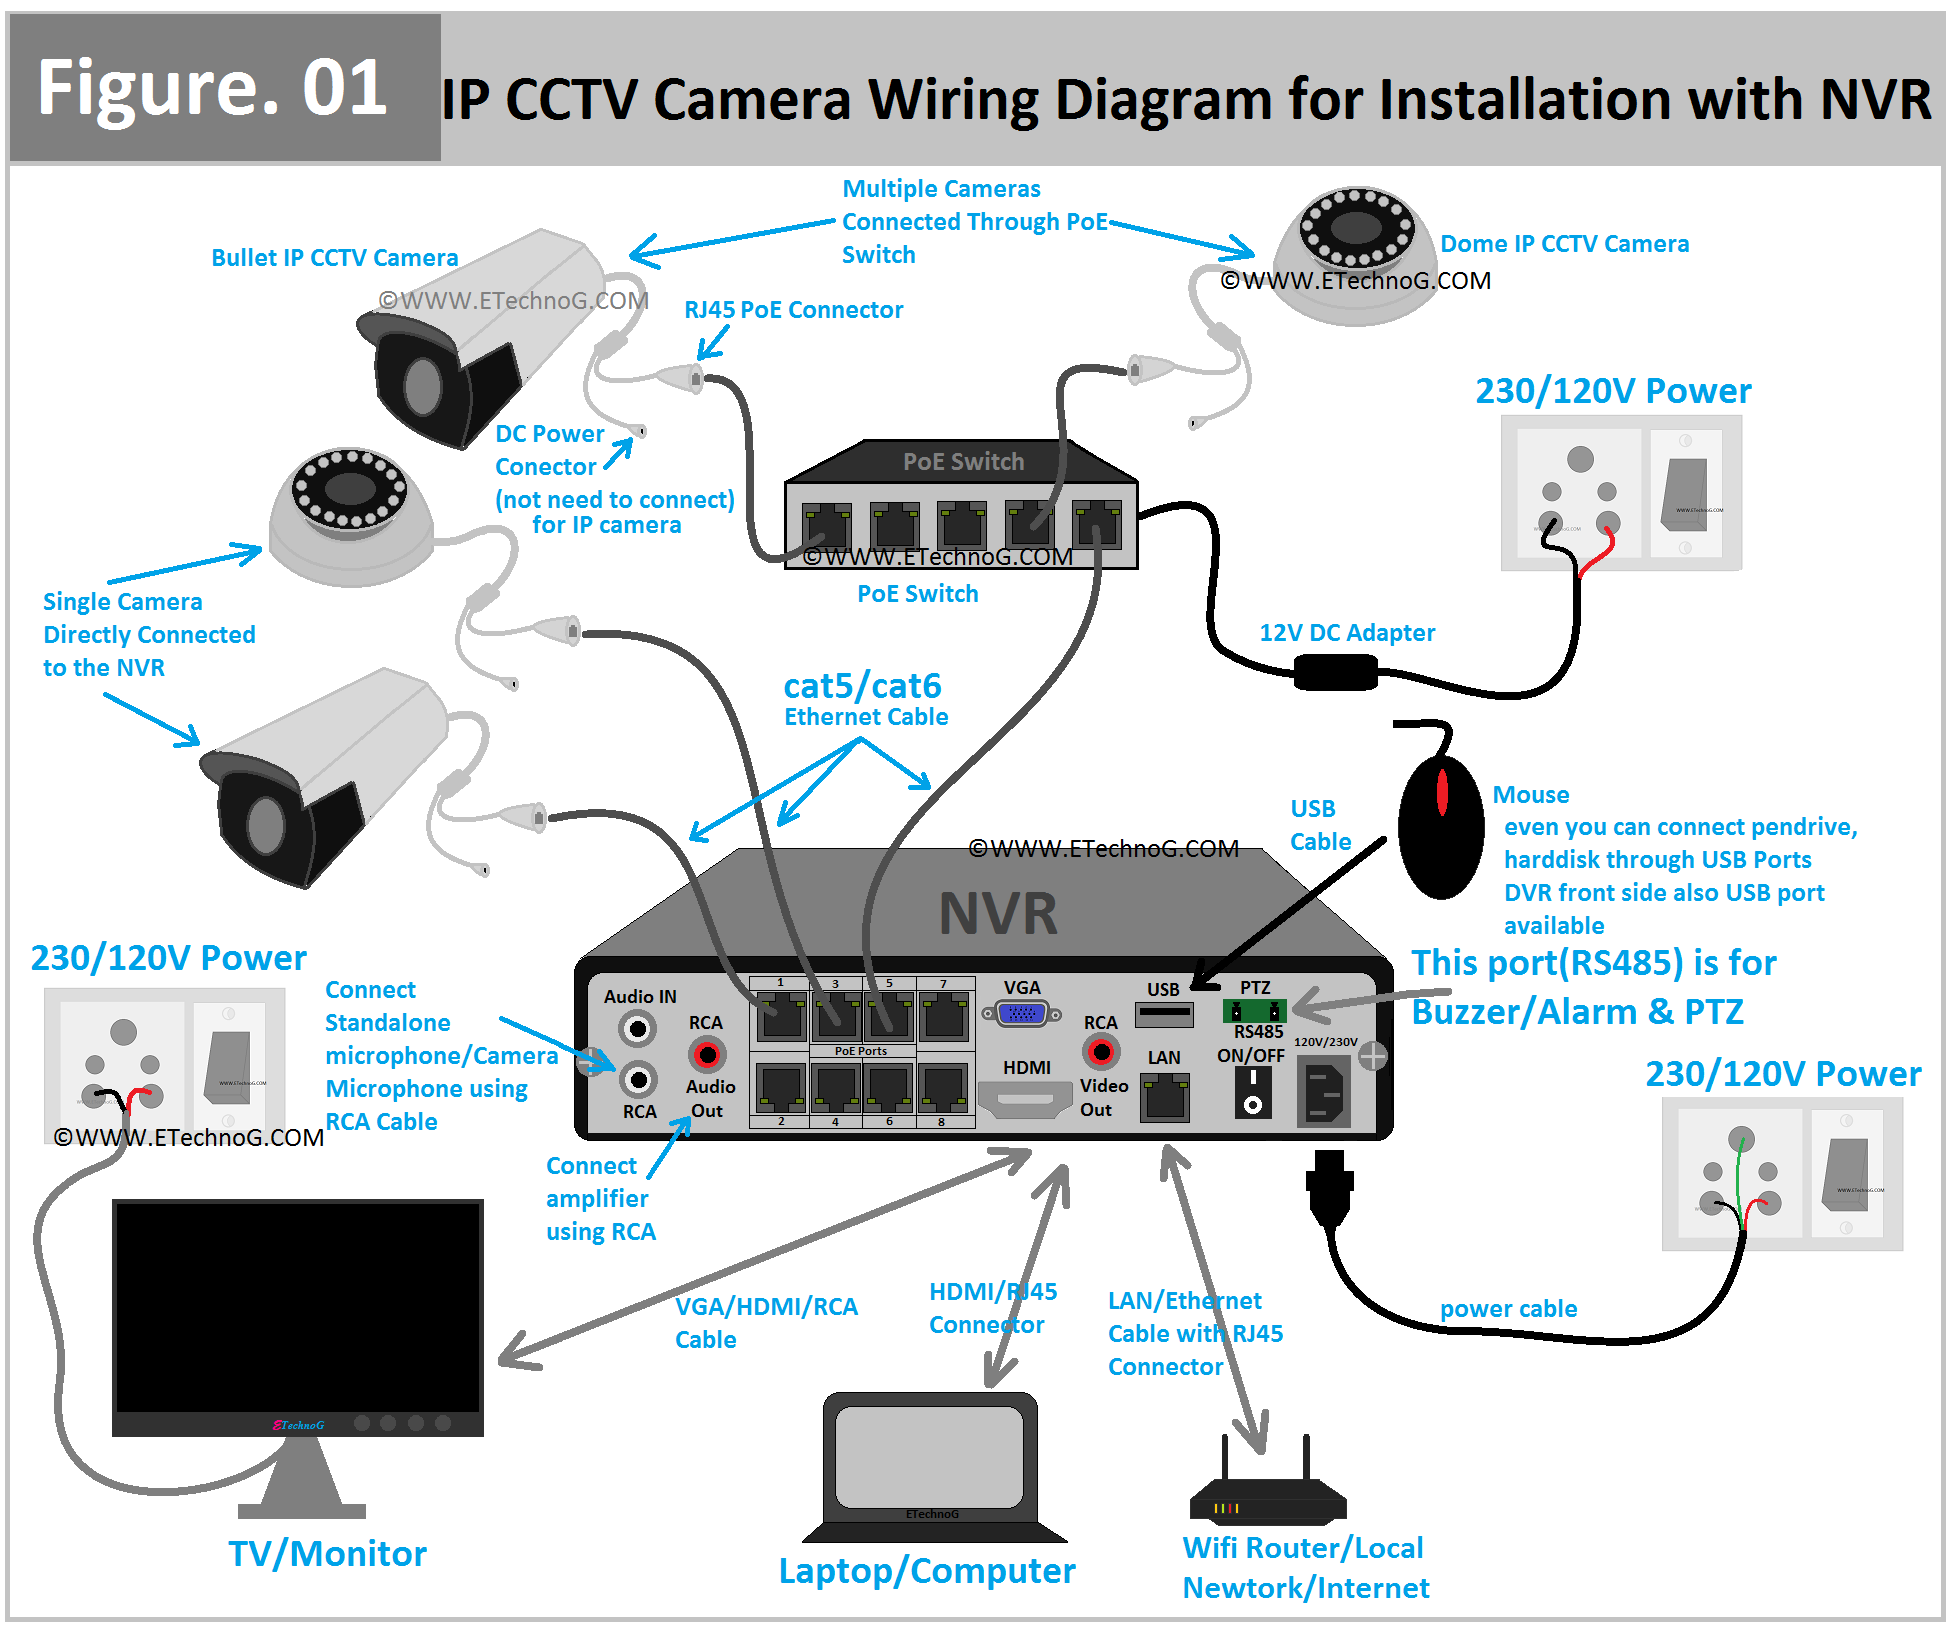
CCTV Camera Wiring Diagram and Connection for Installation with NVR
In this article, we are going to see the wiring diagram of CCTV camera installation with NVR. Generally, IP cameras are used with the NVR. IP Camera full form Internet Protocol Camera. NVR means Network Video Recorder. We know that the DVR camera works with analog signals while the NVR camera works with digital signals. NVR has so many advantages over DVR. CCTV installation with NVR is more expensive and it is used for large areas, shopping malls, industrial buildings, etc. The NVR system required quite a different connection than the DVR system.
List of Devices Required for NVR CCTV Camera Installation
- IP CCTV camera with RJ45 PoE ports(Dome type or Bullet Type as per your requirement)
- NVR(here we have used 8 channels, you can use 4 channels or 16 channels as per your requirement)
- cat5/cat6 Ethernet cable with RJ45 PoE connector(length and quantity as per your requirement)
- Tv/Monitor
- USB Mouse
- USB storage device
- PoE Switch(optional)
- HDMI, VGA, RCA cables (whatever you require)
NVR CCTV Camera Wiring Diagram
Here, you can see the wiring diagram of NVR and IP CCTV cameras with other essential and optional devices. You may not need all the connections. But you can get knowledge of all the connections.
Connection Procedure
Essential Connections - NVR, CCTV Camera, TV/Monitor, Power Supply, Mouse
- Most of the IP CCTV cameras have both PoE and DC power connectors. Remember that the IP CCTV camera does not require a separate power supply if they are connected through a PoE connector. This DC power connector is used to provide a separate DC power supply when the PoE power supply fails. Anyway, connect all the CCTV cameras to the NVR using ethernet cables with PoE connectors. Both Dome and Bullet type CCTV camera needs the same connection.
- Connect the TV/Monitor to the power supply using its power cable.
- Connect the TV/Monitor to the NVR using an RCA or VGA or HDMI connector whatever your TV and NVR have.
- Connect the Mouse to the NVR using the USB port.
- Connect your storage device to the NVR using the USB port.
- NVR does not require a DC power supply. It is to be connected to the 230V AC or 120V AC (whatever your NVR requires) power supply directly using its power cable.
Optional Connections - PoE Switch, Laptop/Computer, Wi-Fi router or Network, PTZ & Alarm, Microphone, Amplifier, and Speaker
- You can connect a single CCTV camera directly to the NVR. But you can connect multiple CCTV cameras using a PoE switch. PoE switch helps to connect more cameras than the NVR has ports. It basically split the connection.
- For example, your NVR has only four channels or ports but you have six cameras. So, you can connect three cameras directly to the NVR. Connect another three cameras to a PoE switch then connect that PoE switch to the NVR.
- Remember that the PoE switch requires an external DC power supply and usually it comes with a DC adapter. So don't forget to connect it.
- Generally, normal CCTV cameras have not been built with a Microphone. If your CCTV camera has a microphone, then it will have an RCA connector. So you can connect the camera microphone or any other standalone microphone to the NVR using RCA cables.
- NVR also has an RCA port for audio output, so you can connect an audio amplifier with the NVR using an RCA cable.
- If you want to connect the NVR to your Laptop or Computer you can use an HDMI cable. Even you can use an Ethernet cable with RJ45 Connector for connecting a laptop or computer with NVR but you may need additional settings or applications.
- The NVR can be connected to the Wi-Fi router or any other networking device using an ethernet cable with RJ45 Connector. Wifi Router helps to get data in your remote devices such as smartphones. The Wi-Fi router also requires a power supply and it comes with its own DC adapter. So don't forget to connect it also.
- Some NVRs has RS485 port. This is used for connecting PTZ such as Joystick controller and Alarm devices.
Read Also:
CCTV Camera Wiring Diagram and Connection for Installation with NVR
 Reviewed by Author
on
January 24, 2023
Rating:
 Reviewed by Author
on
January 24, 2023
Rating:

